Azure · Sitecore
Scaling Sitecore Azure Web App
Before scaling Sitecore Azure Web App, you must read the experience I had and going to share in this post.
Azure Web App
In Azure, you can easily change existent resources almost in real time to accomodate business needs, and this is also applies to Web Apps where you can Scale Up and/or Scale Out your application.
Sitecore
Sitecore offers different architecture models to fit client’s needs, and its roles vary depending on the topology is choosen. Nevertheless, you have the ability to scale either vertical and/or horizontally.
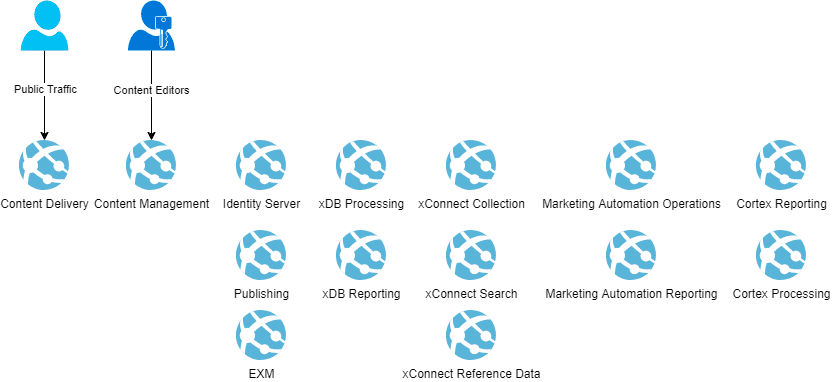
The environment
Everything is hosted in Azure, using Web Apps, and provisioned following Sitecore XP Scaled topology. Here is an idea in how the environment looked like
Before moving forward it is important to know about the difference between Azure Web App and App Service Plans
Azure Web Apps vs App Service Plans
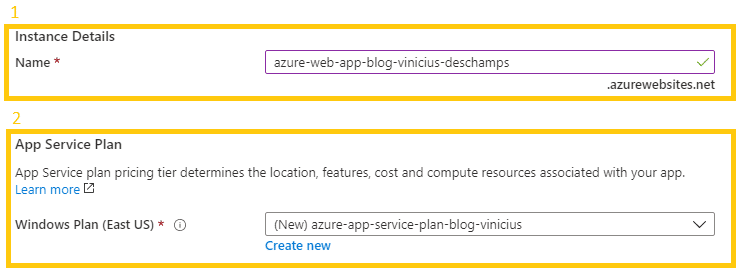
During Azure Web App creation, you are prompted to provide the Instance Details (1) that corresponds to the Web App, and App Service Plan (2) which must be one of the following: create new or choose an existent one from the dropdown list.
The relation between Web App and App Service Plan can be illustrated as the image below

N Web Apps can use the same App Service Plan, as long as the resources the App Service Plan can handle.
In addition to that, an idea that helps to understand is to think like
- App Service Plan is the physical or virtual server which has the resources (CPU, memory, etc)
- Web App is the web server where configuration and settings sits
That said, we wanted to Scale Out both CM and CD, and everything went well with the CD, so let’s attempt to perform the same on CM.
Scale Out CM idea
When you Scale Out your application, a Load Balancer is added in front of your Azure Web App, and Sitecore CM expects exactly that for a horizontal scaling
You can set up multiple instances behind a load balancer. All instances must connect to a centrally located master database
https://doc.sitecore.com/developers/100/platform-administration-and-architecture/en/scaling-and-configuring-content-management.html
Thus we have decided to simply Scale Out the CM Web App
Everything went wrong #1
Once all instances were up and running, a couple tests were made and things were working just fine.
However, when multiple users started to work, things started to become out of control with instances randomically restarting out of the blue with the following message
WARN Shutdown message: CONFIG change
Always look for the tiny details
By scaling out the CM, the environment was going from 1 to N servers, and Sitecore has different requirements to make this to happen
InstanceName parameter
You must ensure that each CM instance has a unique name, and that’s OK because the default value set in Sitecore.config file is (machine name and IIS site name), and when you scale out you will get a clone App Service that runs with a unique name.
<!--  INSTANCE NAME
            Unique name for Sitecore instance.
            Default value: (machine name and IIS site name)
      -->
    <setting name="InstanceName" value="" />
Publishing
Only one CM instance can perform publishing, and you must ensure that each CM instance points to the publishing CM instance, and again that’s OK because the environment has a dedicated Publishing Service.
ValidationKey and DecryptionKey
Ensure that the values is the same on all the Sitecore instances within the environment and that the IsolateApps modifier is not present in either value, and in the environment configuration these parameters were set fixed and statically.
Indexing
Since a Scale Out simply clone the file system, and doesn’t allow us to have control in each new server’s file system to modify the Indexing configuration, Sitecore CM was getting confuse with multiple servers performing the indexing role.
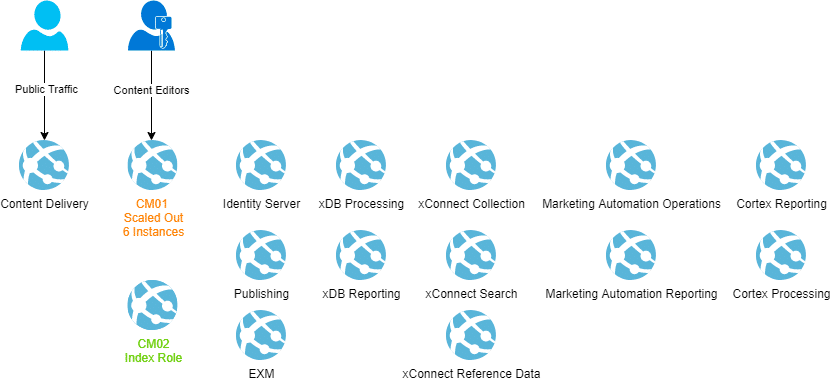
Now, that the issue has been identified, the idea was to provisioning a new Content Management using its own App Service (and App Service Plan) where the file system could be modified as needed.
So, let’s call this new Content Management CM02 and the existent CM01.
Enable Indexing sub-role CM02
The idea is to have CM02 with the Indexing sub-role, and to accomplish that a modification must be done in the Web.config
<add key="role:define" value="ContentManagement, Indexing, Indexer"/>Starting in Sitecore 9.2, when you assign the indexing sub-role to a server role, that role manages content indexing automatically and the other server roles that have not been assisgned this sub-role do not index content
https://dev.sitecore.net/Downloads/Sitecore%20Experience%20Platform/92/Sitecore%20Experience%20Platform%2092%20Initial%20Release/Release%20Notes
Disable Indexing sub-role CM01
IMPORTANT: If you are using Sitecore 9.2 and newer, you don’t need to disable indexing on other CMs
For each Index you have configured, you must change its indexUpdateStrategies to manual like the example below
<index id="sitecore_index" type="Sitecore.ContentSearch.SolrProvider.SolrSearchIndex,
 Sitecore.ContentSearch.SolrProvider">
 <param desc="name">$(id)</param>
 <param desc="core">$(id)</param>
 <param desc="propertyStore"
 ref="contentSearch/indexConfigurations/databasePropertyStore"
 param1="$(id)" />
 <strategies hint="list:AddStrategy">
 <strategy ref="contentSearch/indexConfigurations/indexUpdateStrategies/manual" />
 </strategies>
Once these changes were applied, here is how the environment look like
Everything went wrong #2
Now, we have everything that is required to have a multiple CM environment
- Load Balancer in front of the CMs
- InstanceName parameter with Unique Names
- A Publishing Server
- Same ValidationKey and DecryptionKey for all CMs
- One CM to handle Indexing
And things were looking very promising, well… well… until the instances from the scaled out CM01 started to fall apart and, again, randomly and with the exactly same message.
WARN Shutdown message: CONFIG change
What else could be wrong? After some research, I found something answered our question
Accordingly to Sitecore Managed Cloud documentation
Scale out is not supported for CM
https://doc.sitecore.com/developers/managed-cloud/en/scaling-options-for-managed-cloud.html
The solution
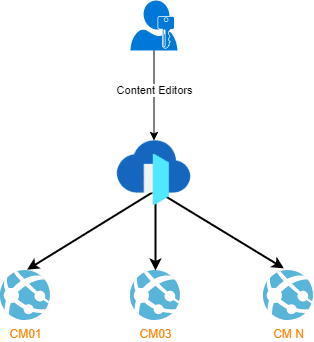
That said, the only possibility would be to have additional CMs each of them in their own App Service Plan.
However, since we are not scaling the CM App Service anymore, we don’t have a load balancer to split the load between the multiple CMs and there are some important things to know
- Azure Load Balancer does not work with Azure App Services, even if you configure VNet for them
- WAF and Application Gateway are not compatible with Content Management servers
So, you either come up with a third party solution that will assist you in have a Load Balancer for your CMs or you can use Azure Front Door but please keep in mind the following
Use of this technology within a Sitecore solution is permitted, but the Sitecore Support team can only assist with Sitecore product issues that are not unique to the use of the technology, that is, a Sitecore product issue that can be replicated without the technology present.
In some cases, the Sitecore Support team may ask for replication of the issue without the use of the technology, although they will try to avoid this.
https://kb.sitecore.net/articles/682999#Notes
In my case, I am going to use it and here is how it suppose to be
Configure Azure Front Door
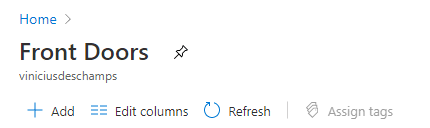
Search for Front Doors, and click Front Doors in Azure Search field

Click Add to create a new Front Door
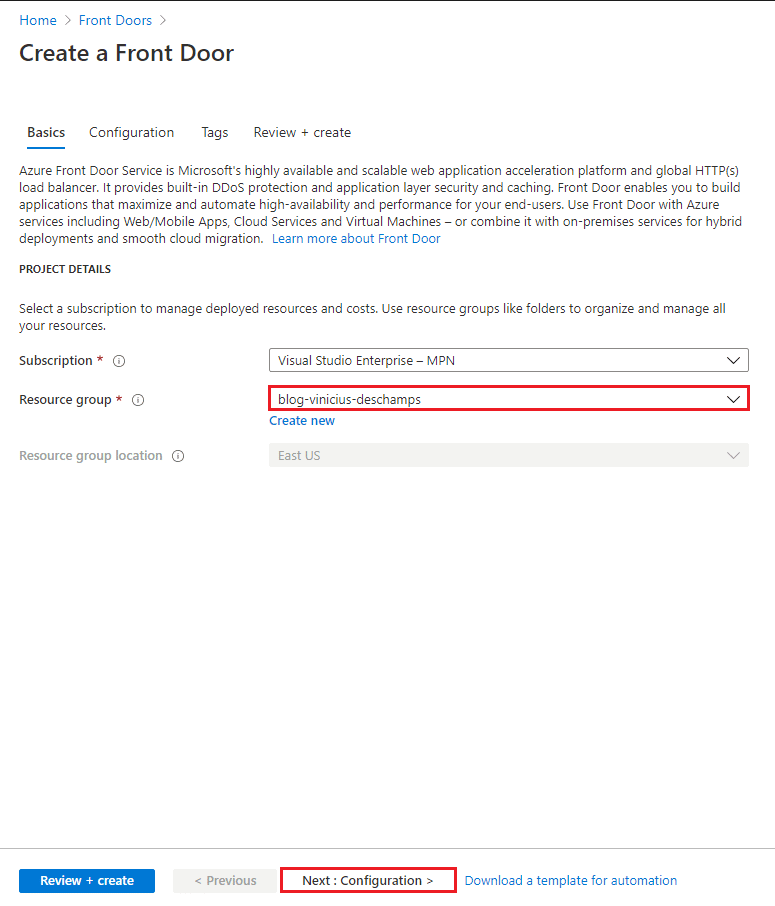
In Basics choose the appropriate Resource Group or create a new one, and Next : Configuration >
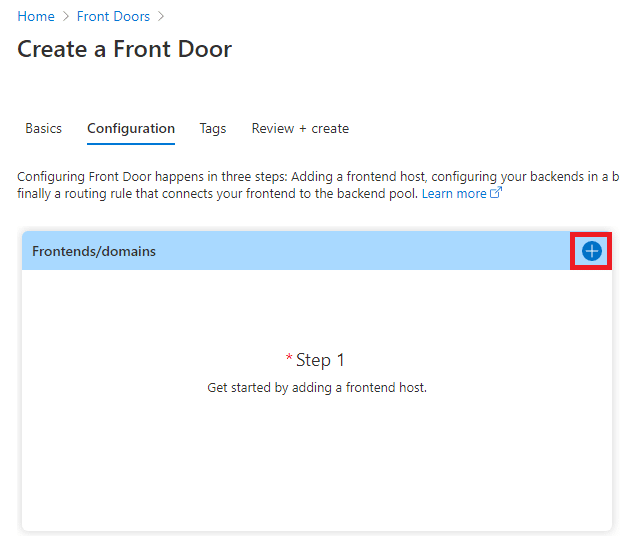
At Configuration you will see 3 steps, let’s start by clicking at the + sign on Step 1
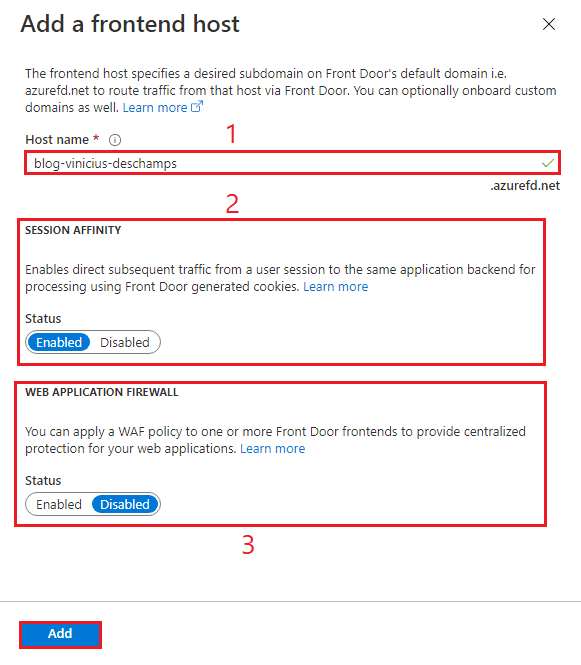
In Add a frontend host provide Host name (1), ensure to choose Enabled for Session Affinity (2) and disabled for Web Application Firewall (3) – since Sitecore does not like it – and click Add
Let’s move to the Step 2 by clicking in the + sign
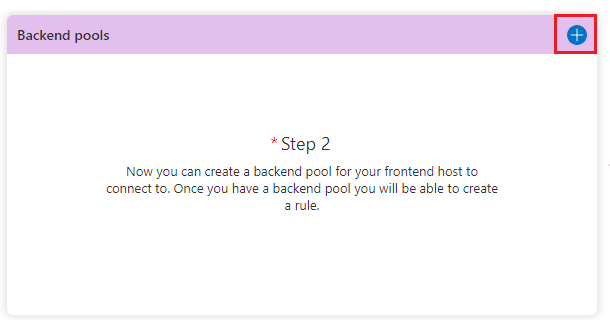
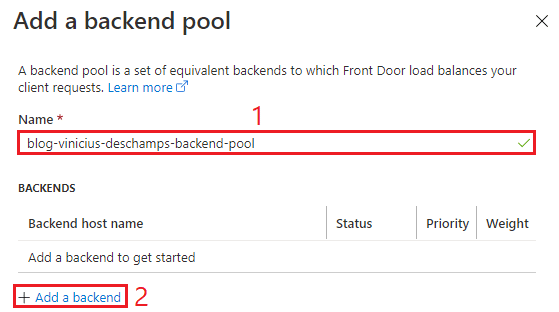
Add a backend pool by giving it a Name (1) and + Add a backend (2)
Choose a Backend host type (1), in our case an App Service, then choose the Backend host name (2) and its Backend host header (3), and hit Add
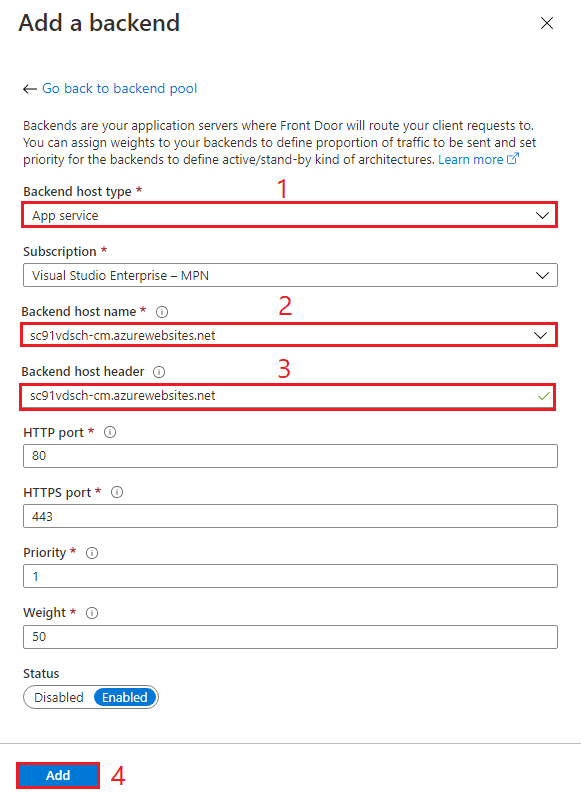
Ensure to repeat the step above by clicking + Add a backend until you have all CM Web Apps added
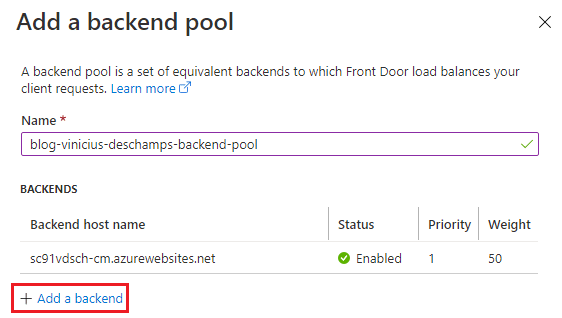
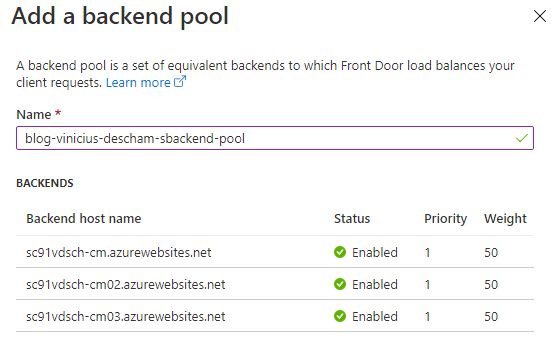
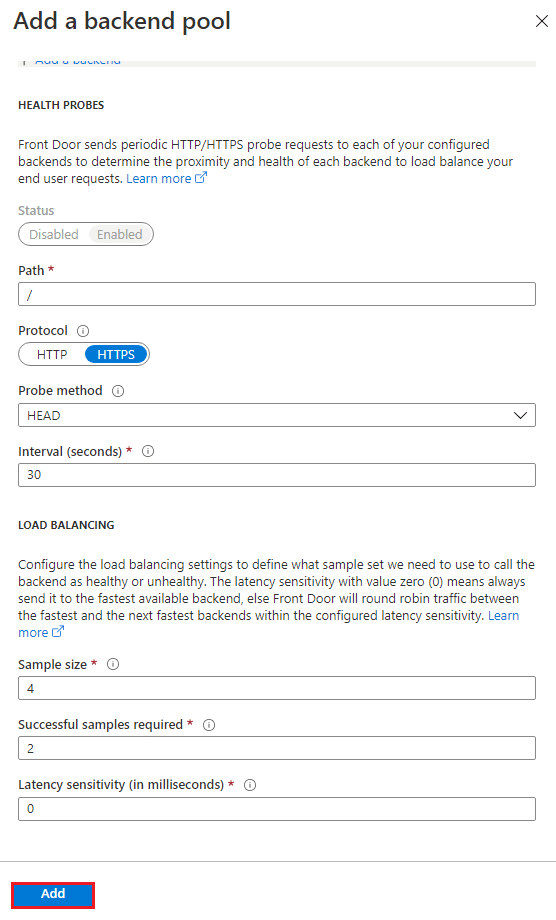
Once you have all Web Apps, you can continue on Add a backend pool options, and simply click Add
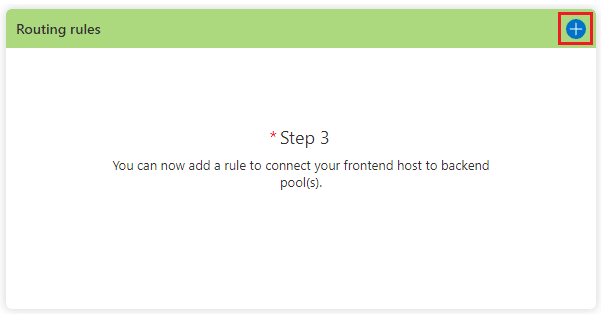
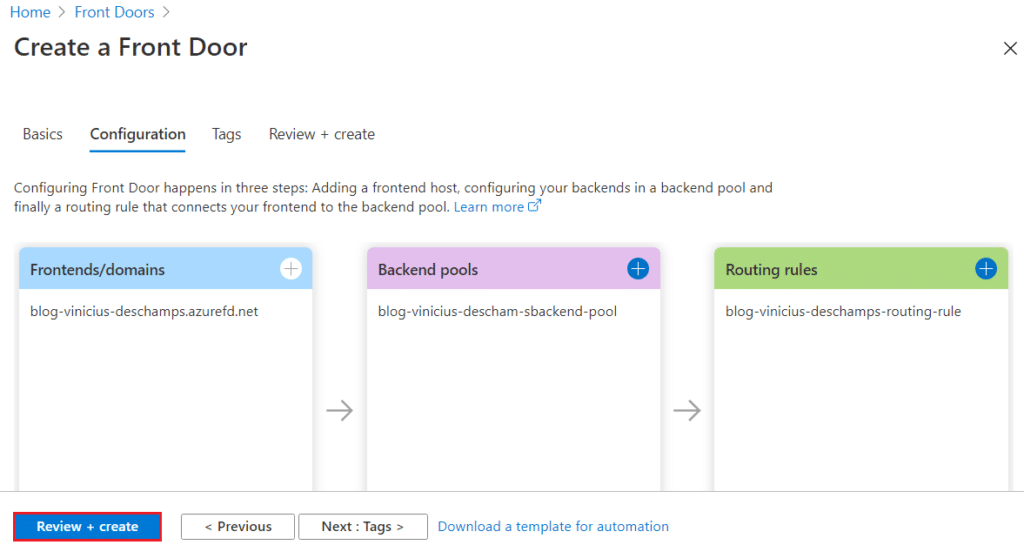
Finally, let’s configure the Step3 by clicking at + sign
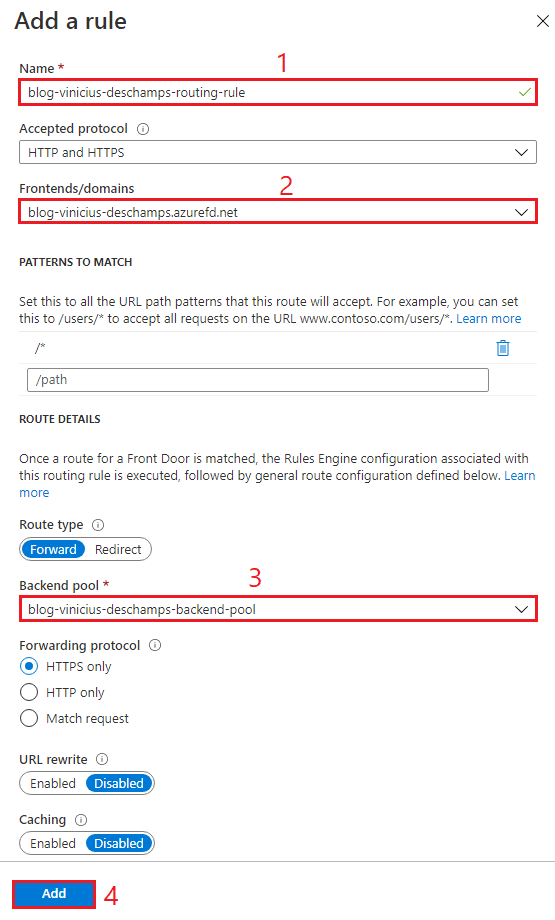
Give it a Name (1), and choose its Frontends/domains (2) and the Backend pool (3), then press Add (4)
Now that you have all 3 steps configured hit Review + Create
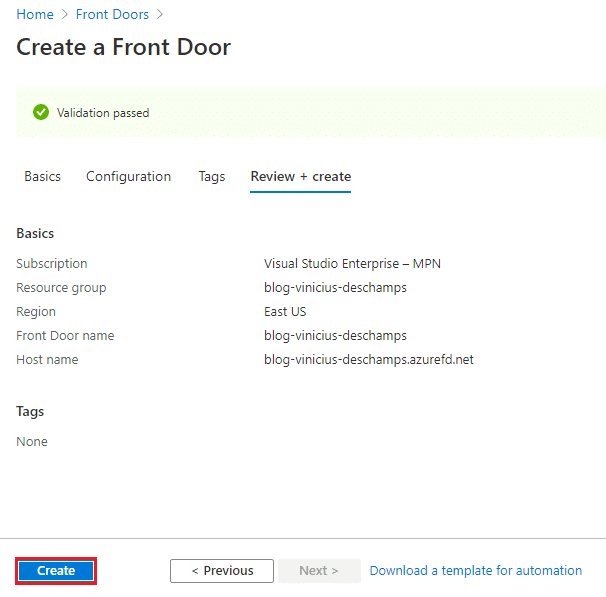
Review the information and hit Create
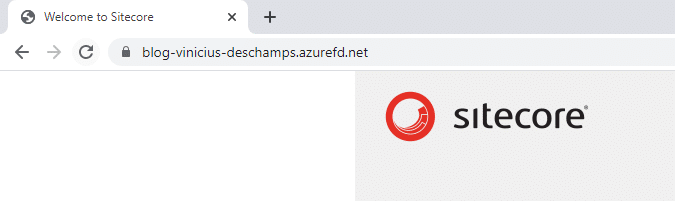
You should wait until Front Door is provisioned, and you can access from your browser the host name you have set, in my case is https://blog-vinicius-deschamps.azurefd.net
Great but you probably don’t want to share an azurefd.net domain with your Content Editors so they can access your CM. Let’s see how to configure a custom domain.
Custom domain Azure Front Door
Go to the Front Door (1), select Front Door designer (2), then click in the + (3) at Frontends/domains

You should choose a Custom host name, and you will receive a message saying that a CNAME configuration must be done at your DNS
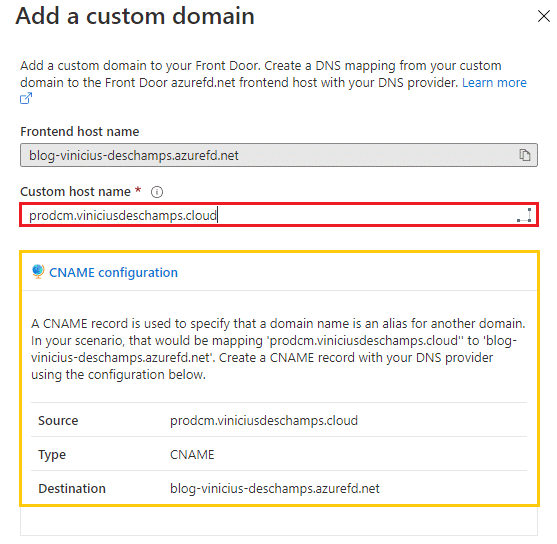
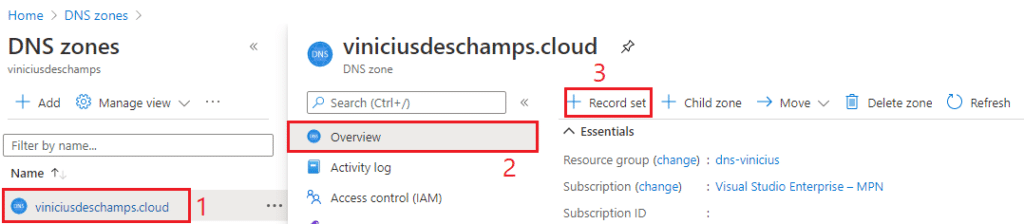
I am using Azure DNS, so I went to my domain viniciusdeschamps.cloud (1), selected Overview (2) and + Record set (3)
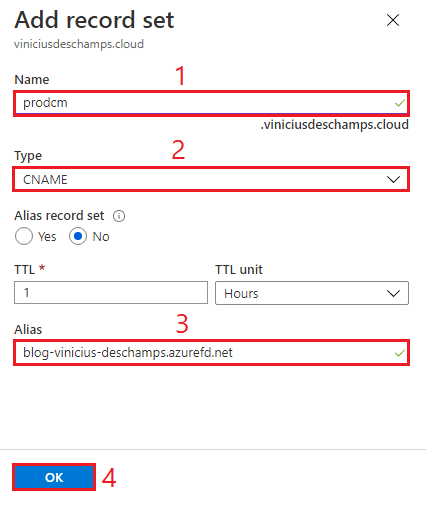
In Add record set, add a Name (1), select the Type (2) and add the Alias (3), then hit Ok (4)
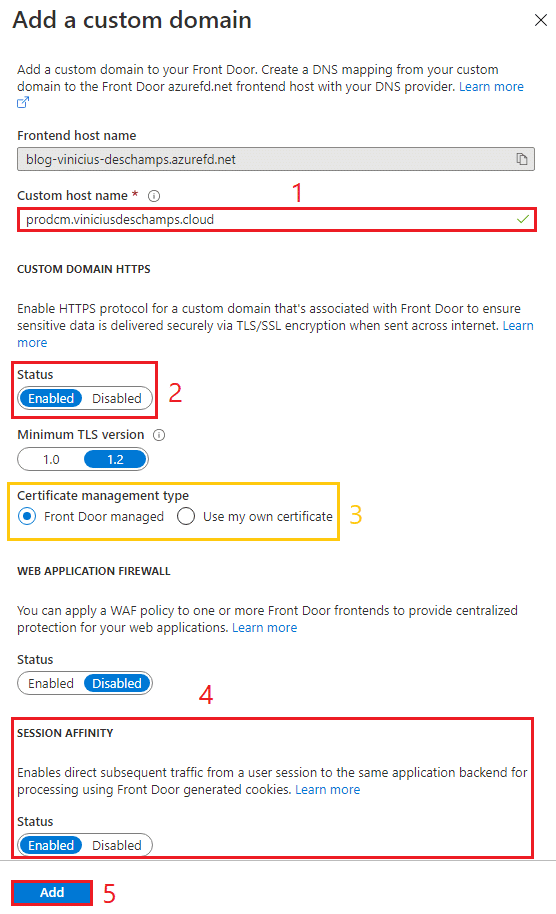
Back to Front Door, and type your Custom host name (1) again, choose Enabled (2) for Custom Domain HTTPS, and in a Production environment use your own certificate but in my case I’m going to use Front Door managed (3), and don’t forget to Enabled (4) Session Affinity and press Add (5)
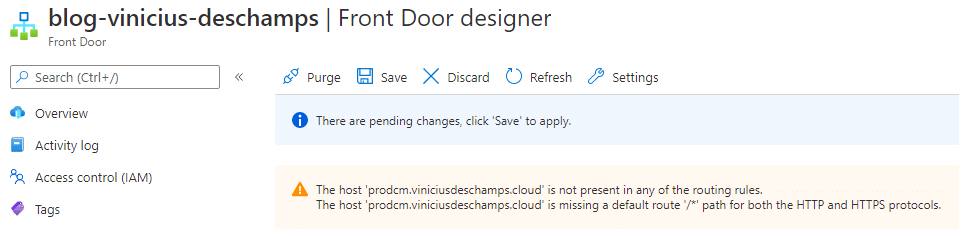
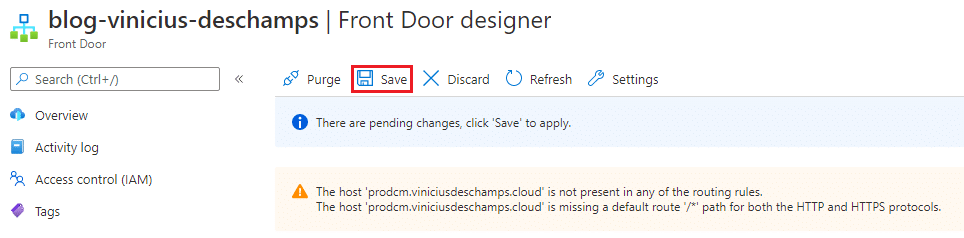
In Front Door Designer you will see the following warning
The host ‘your-custom-host.domain’ is not present in any of the routing rules.
The host ‘your-custom-host.domain’ is missing a default route ‘/*’ path for both the HTTP and HTTPS protocolos
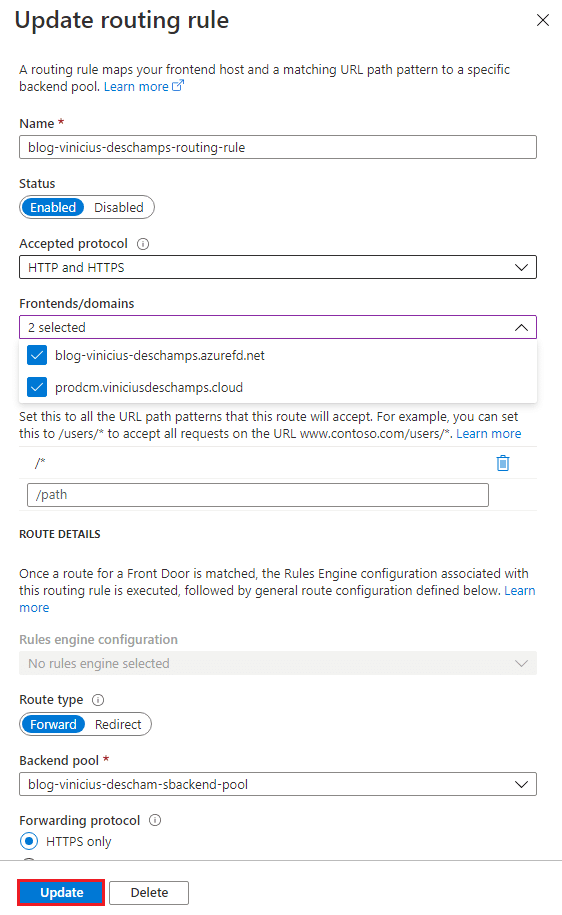
Select the existing Routing rules
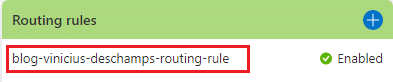
And in Frontends/domains choose the recently added domain from the list
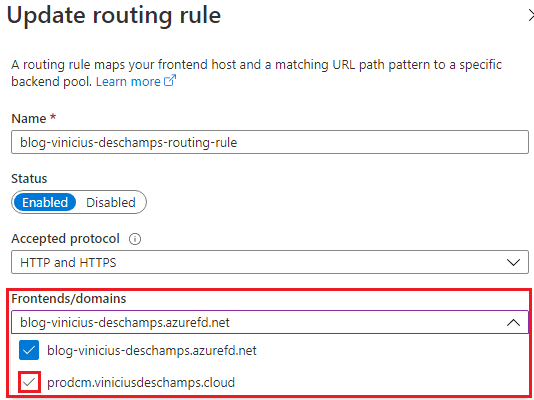
Then, press Update
Once you have done, click Save in Front Door designer

Please wait for a while until you get a confirmation the configuration has been applied, in my case, it took a while because I choose the Front Door managed certificate


Sitecore Identity Server Unauthorized_Client
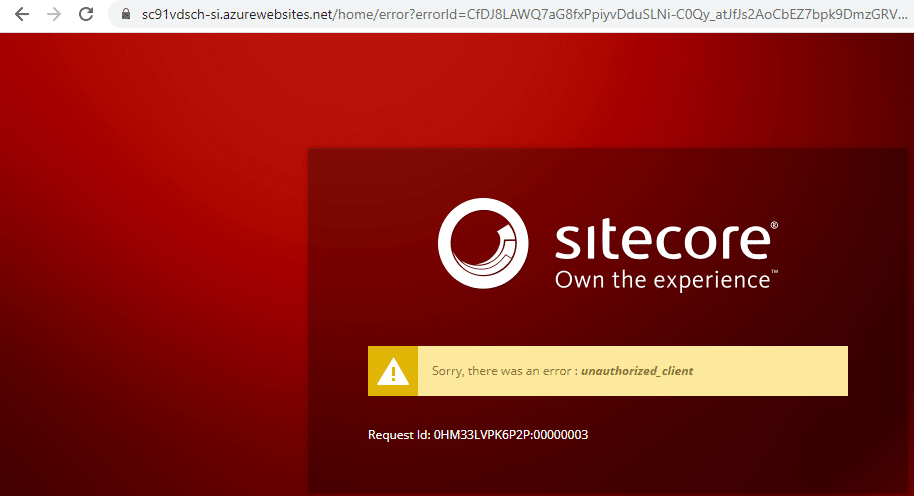
Once the Azure Front Door was updated with the new Custom Domain, I tried to access https://prodcm.viniciusdeschamps.cloud/sitecore and when hit the Identity Server got the following message
Sorry, there was an error: unauthorized_client
And this happens because in the Identity Server configuration you should set from which URLs authentication requests should be accepted
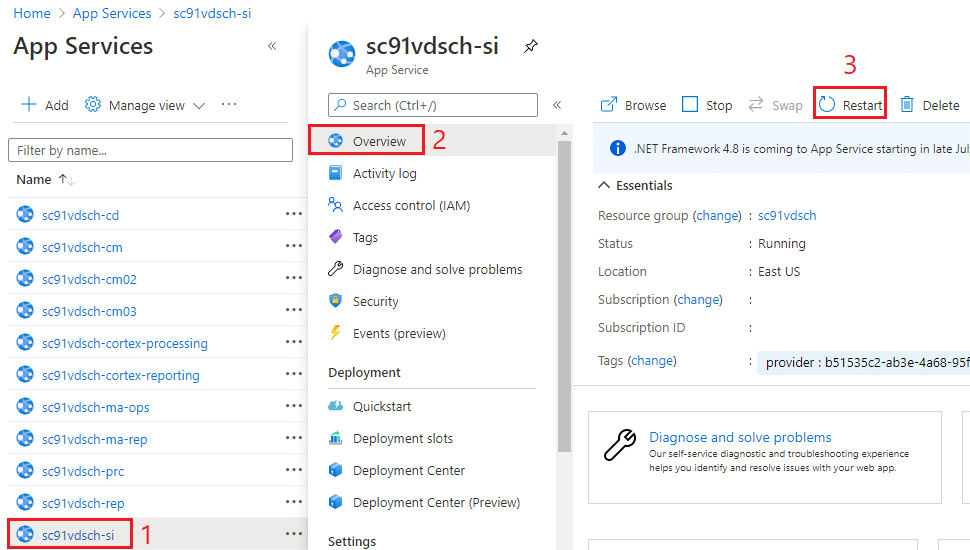
In order to fix it, you should go to Sitecore Identity Server App Service (1), Advanced Tools (2) and Go (3)
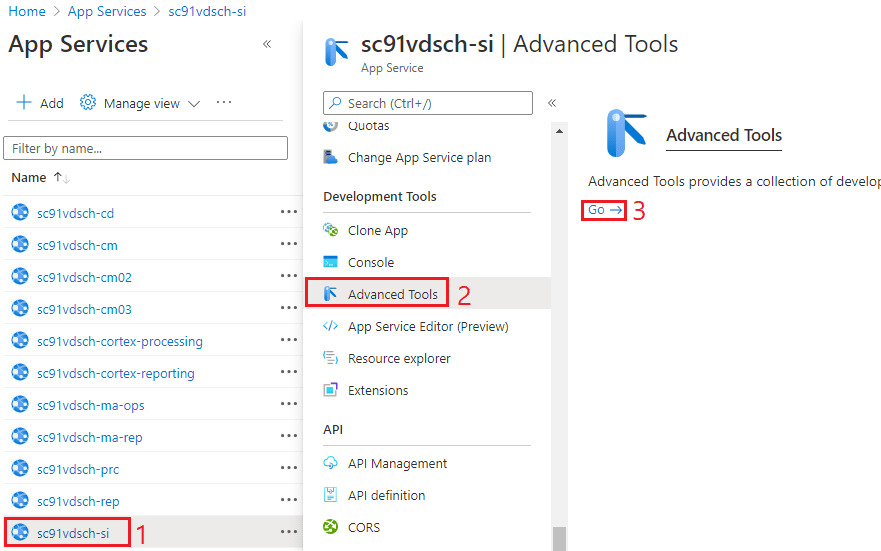
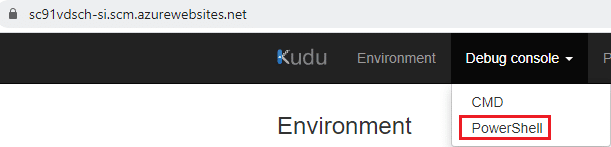
Select Debug console, and Powershell
Navigate to site\wwwroot\Config\production, and access the following file Sitecore.IdentityServer.Host.xml then modify the following line
<AllowedCorsOriginsGroup1>https://sc91vdsch-cm.azurewebsites.net|https://</AllowedCorsOriginsGroup1>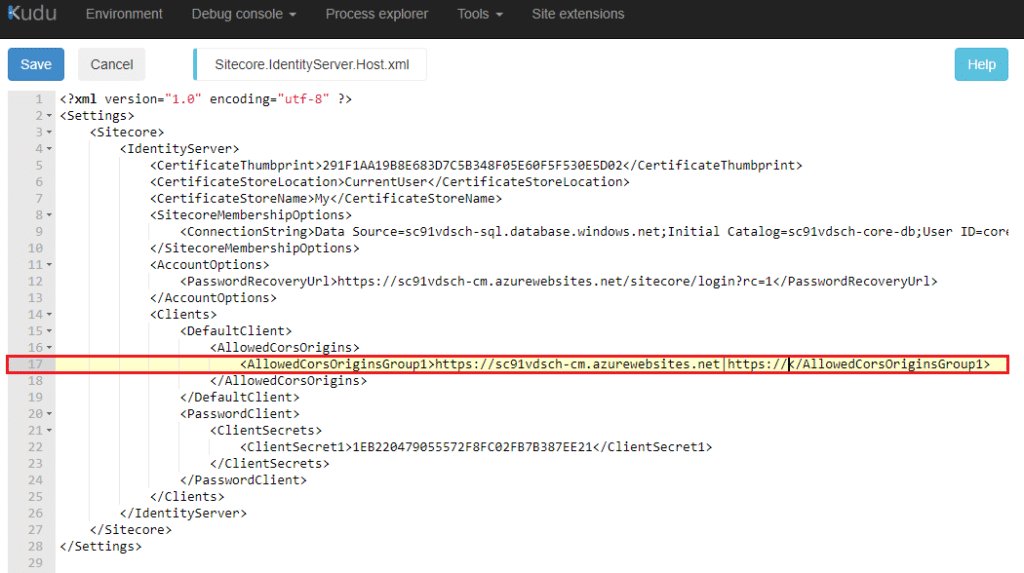
By adding all Content Management URLs as follows, and hit Save
<AllowedCorsOriginsGroup1>https://sc91vdsch-cm.azurewebsites.net|https://sc91vdsch-cm02.azurewebsites.net|https://sc91vdsch-cm03.azurewebsites.net|https://prodcm.viniciusdeschamps.cloud</AllowedCorsOriginsGroup1>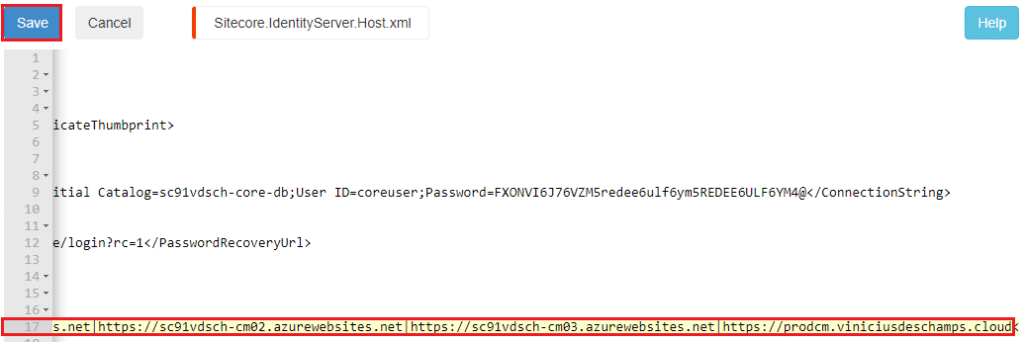
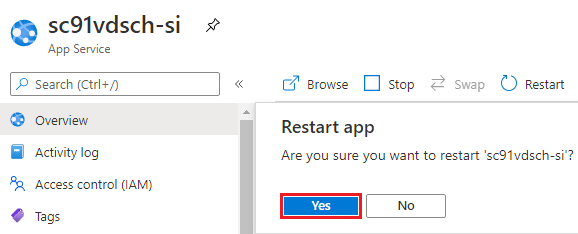
Once the modification is saved, you should Restart the Sitecore Identity Server App Service
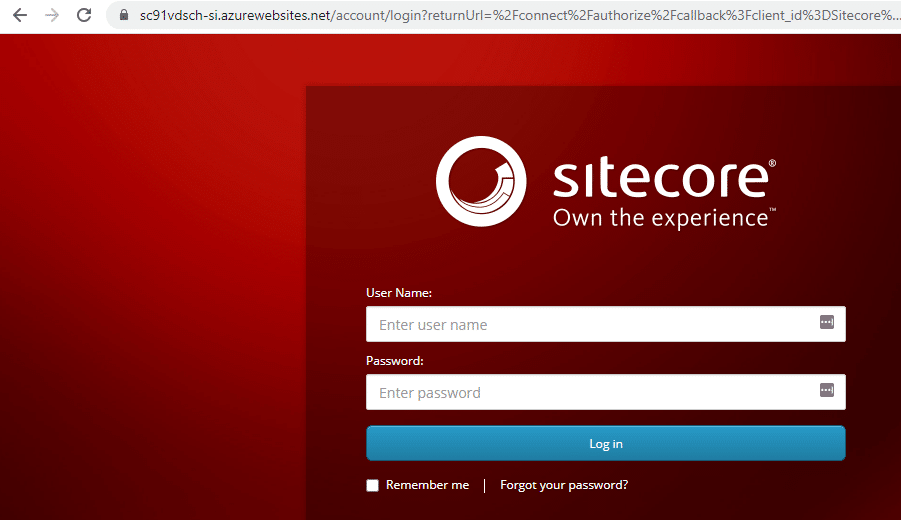
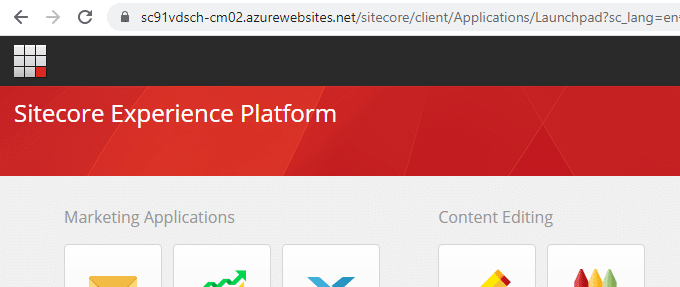
Once the restart is completed, try to access Sitecore CM using the custom domain configured on Azure Front Door, in my case https://prodcm.viniciusdeschamps.cloud/sitecore and voilá no error
I got redirect to the Sitecore Experience Platform, and as you can see to the CM02 but that’s not I want for my end users, so there are additional steps to address it. Well, at least we know the Front Door is splitting the traffic
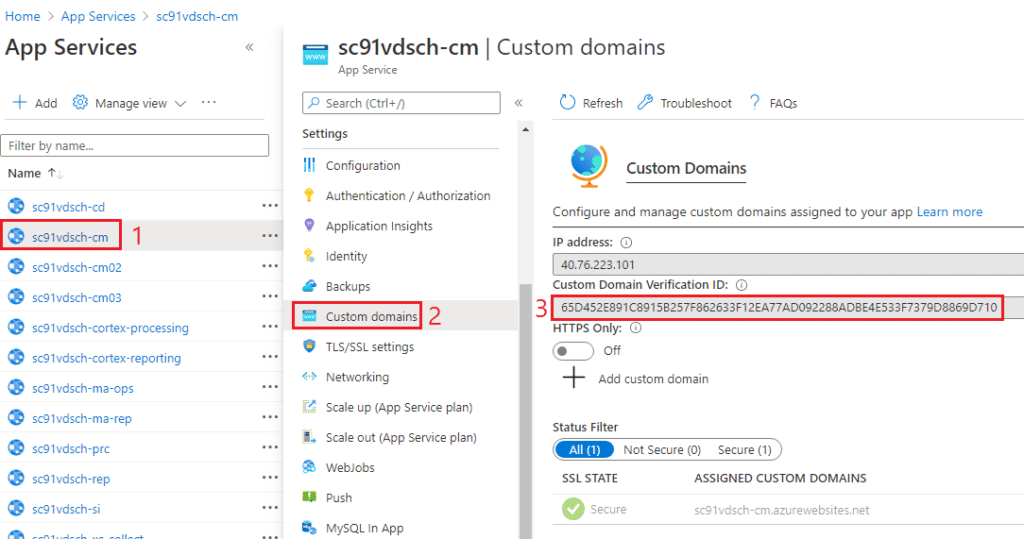
Custom Domains for App Services
Navigate to the App Services, and choose one of the CMs (1), select Custom Domains (2) and copy the Custom Domain Verification ID (3)
Go to your DNS provider, in my case Azure DNS, and let’s add a new Record Set
The step below is to check domain ownership, and you should fill the information as follows
- Name – asuid.SUBDOMAIN (e.g asuid.prodcm)
- Type – TXT
- Value – Paste the value you copied from Custom Domain Verification ID
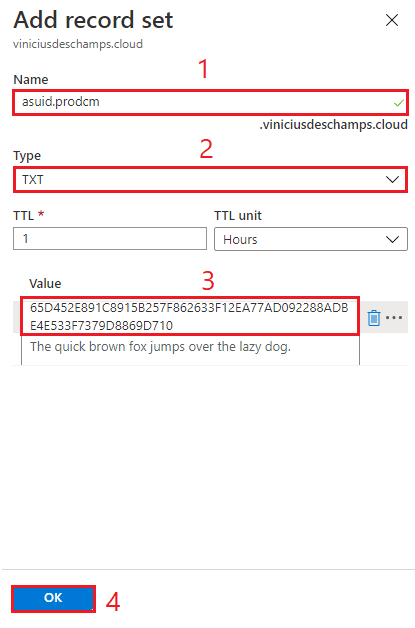
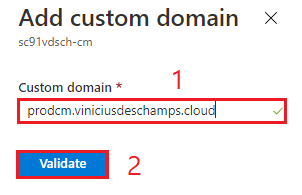
Back to the Custom Domains, and click Add custom domain (3)
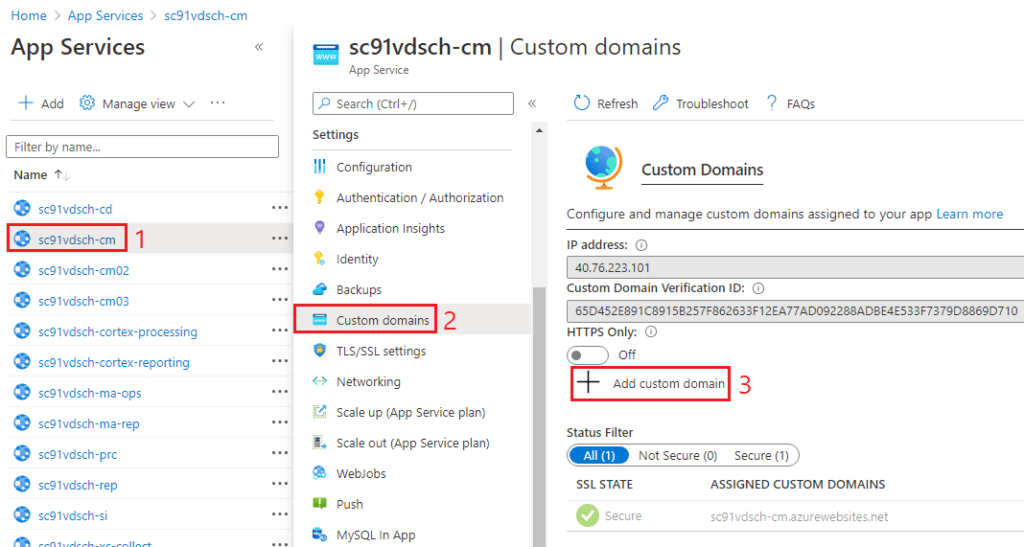
Type your Custom Domain (1), then click Validate (2)
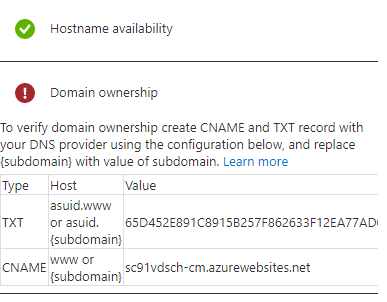
Sometimes it take a while until the record is sync, and you might see the following message
Domain ownership
To verify domain ownership create CNAME and TXT record with your DNS provider
Since we already have a CNAME configured for the Azure Front Door, the CNAME record is not required
Wait for a while and try to Validate the Custom Domain again, and if everything is OK, you should see the following and hit Add custom domain
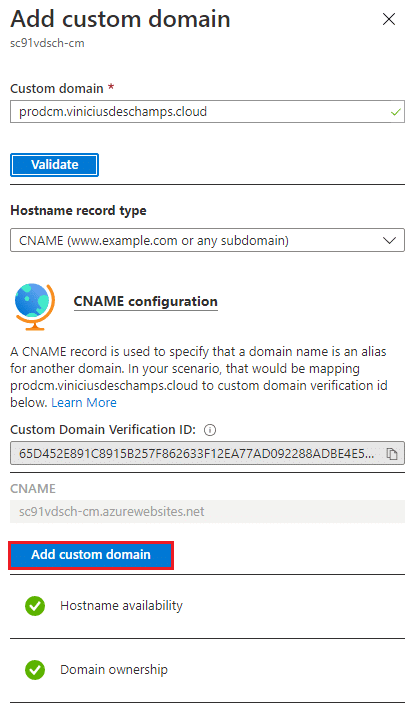
IMPORTANT: You should add the same custom domain to every CM App Service!
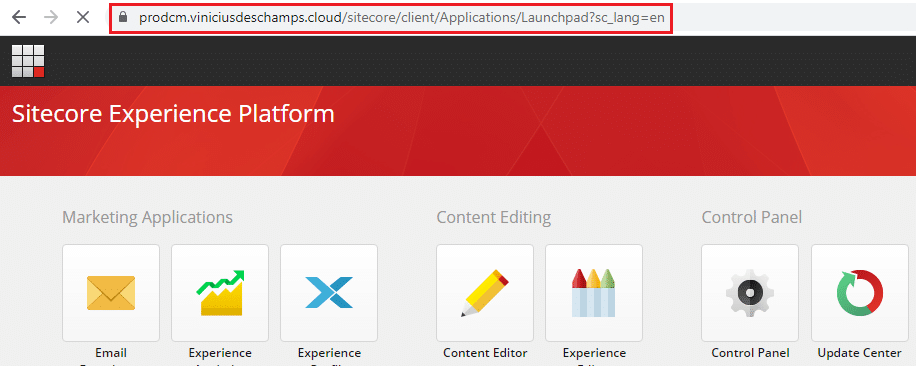
And finally, when you access your Azure Front Door custom domain to hit Sitecore you will notice that now you have a single URL for all Content Management, which in my case is https://prodcm.viniciusdeschamps.cloud
And that’s it!
I hope you liked, and I’ll see you on my next post.
Photo by Marius Masalar on Unsplash