After configuring valid certificates in MongoDB it is time to establish the communication from Sitecore to MongoDB, and unfortunately Sitecore does not communicate with Mongo using SSL Out of the box.
I found a good article that explain how to achieve it, however, I don’t have any experience on it and had to ask for help to my colleague Leonardo Faggiani
Our first successful attempt was using a PFX file that requires a password but the problem was
Nobody wants to expose password in config files, specially for a PFX file!
So, we started thinking about using the Windows Certificate Store to retrieve the certificate! And in order to accomplish that, we need to extend UpdateMongoDriverSettingsProcessor class to update Mongo Driver Settings with the SSL certificate.
public class EnableSSL : UpdateMongoDriverSettingsProcessor – This method allow users to turn on/off the SSL settings.
[code language=”csharp”]
private bool UseSSL()
{
string value = Settings.GetSetting(“UseSSL”);
return !string.IsNullOrEmpty(value) && Convert.ToBoolean(value);
}
Self-explaned method
private StoreName? FindStoreName()
{
StoreName storeName = StoreName.My;
try
{
storeName = (StoreName)Enum.Parse(typeof(StoreName), Settings.GetSetting(“SSLCertificateStoreName”));
}
catch (Exception e)
{
Log.Error(“Error loading store certificate: Settings.GetSetting(SSLCertificateStoreName) ” + e.Message, this);
return null;
}
return storeName;
}
[/code]
The Certificate Store must be opened in order to find the certificate.
[code language=”csharp”]
private X509Certificate2 FindX509Certificate2()
{
StoreName? nullableStoreName = FindStoreName();
if (nullableStoreName == null) return null;
X509Certificate2 firstCertificate = null;
StoreName storeName = (StoreName)nullableStoreName;
X509Store store = new X509Store(storeName, StoreLocation.LocalMachine);
try
{
store.Open(OpenFlags.MaxAllowed);
var certificates = store.Certificates.Find(X509FindType.FindByThumbprint, Settings.GetSetting(“SSLCertificateThumbprint”), false);
firstCertificate = certificates.Count > 0 ? certificates[0] : null;
if (firstCertificate == null)
Log.Warn(“Cannot find certificate with thumbprint ” + Settings.GetSetting(“SSLCertificateThumbprint”), this);
}
finally
{
store.Close();
}
return firstCertificate;
}
[/code]
Overridden method join all the pieces
[code language=”csharp”]
public override void UpdateSettings(UpdateMongoDriverSettingsArgs args)
{
if (UseSSL())
{
X509Certificate2 x509Certificate2 = FindX509Certificate2();
if (x509Certificate2 == null) return;
args.MongoSettings.SslSettings = new SslSettings();
args.MongoSettings.SslSettings.ClientCertificates = new[] { x509Certificate2 };
args.MongoSettings.SslSettings.CheckCertificateRevocation = false;
args.MongoSettings.SslSettings.EnabledSslProtocols = SslProtocols.Tls12;
args.MongoSettings.UseSsl = true;
}
}
[/code]
Finally, we need a .config file in order to add those configurations and push the code in the Sitecore’s pipeline
<configuration xmlns:patch=”http://www.sitecore.net/xmlconfig/”>
<sitecore>
<settings>
<setting name=”UseSSL”>
<patch:attribute name=”value”>true</patch:attribute>
</setting>
<setting name=”SSLCertificateStoreName”>
<patch:attribute name=”value”>My</patch:attribute>
</setting>
<setting name=”SSLCertificateThumbprint”>
<patch:attribute name=”value”>33d567ffc26697605c31ebd4bd87c7254128f049</patch:attribute>
</setting>
</settings>
<pipelines>
<updateMongoDriverSettings>
<processor type=”Custom.MongoDriver.EnableSSL, Custom.MongoDriver” />
</updateMongoDriverSettings>
</pipelines>
</sitecore>
</configuration>
Once we’ve applied it to the Sitecore installation, it didn’t work from beginning and after couple hours troubleshooting here’s what we found to solve it
The Solution
Open Certificate Store
1. Open a Command Prompt window, and type mmc then press Enter
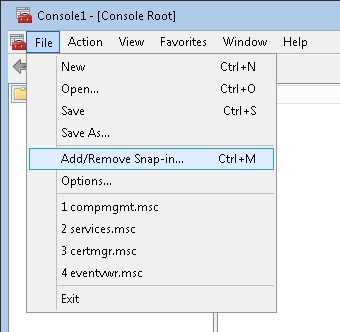
2. On the File menu, click Add/Remove Snap In
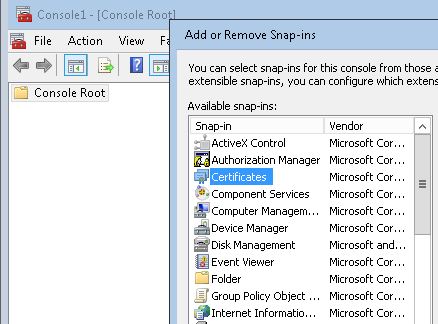
3. Double click Certificates
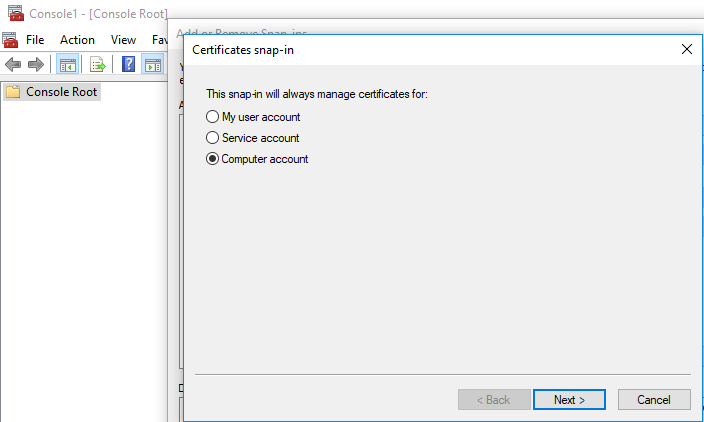
4. Select Computer Account, and click Next
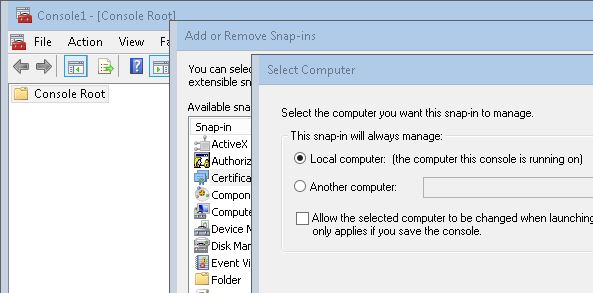
5. Select Local Computer, and click Finish then click OK to exit the Snap-in window
Manage Private Key Permissions
Assuming you have the private key installed already, and Certificate Store still open, please follow the steps below
1. In the left pane of MMC, expand Certificates (Local Computer) node, expand the Personal node, and then select the Certificates subfolder
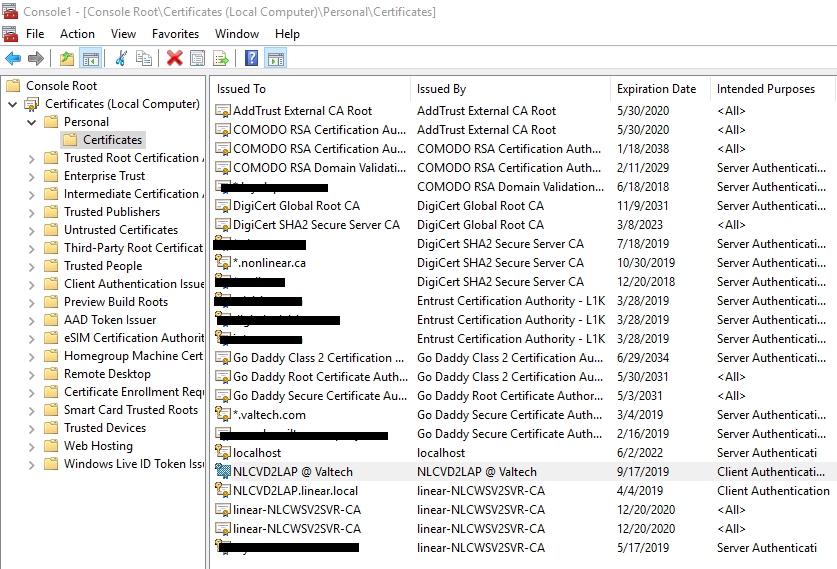
2. In the right pane, look for your certificate – in my case it is NLCVD2LAP @ Valtech – right-click in the certificate, choose All Tasks, and then choose Manage Private Keys.
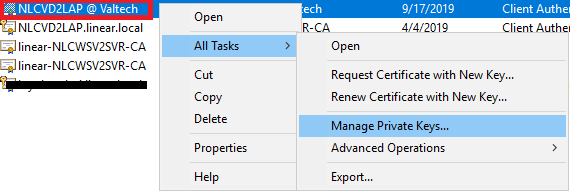
A Permissions window shows up, and you have to add the user that is running the Application Pool of your Sitecore instance which could be either ApplicationPoolIdentity, NetworkService or a special account just for that.
3. Click Add in the Permissions window, and let’s grant privileges to our Application Pool user
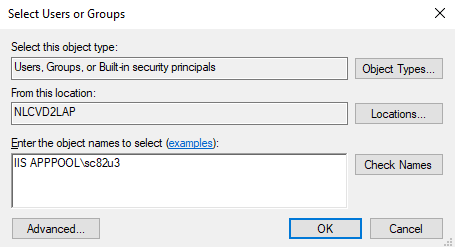
Please note that in my case the Sitecore was running using the ApplicationPoolIdentity using an ApplicationPool named sc82u3
4. Ensure the permissions are Full Control and Read for testing purposes only, then click Ok
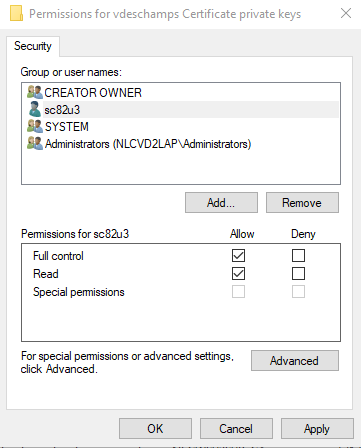
Once we have done the permission stuff, the solution provided by Leonardo, started to work right away!
I hope you liked it, and thanks for reading!
And I’ll see you on my next post!
